autism

Special Education Visuals!

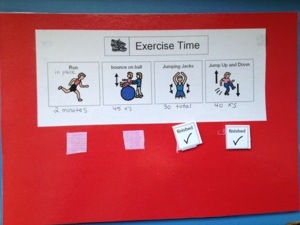
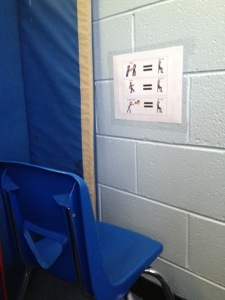
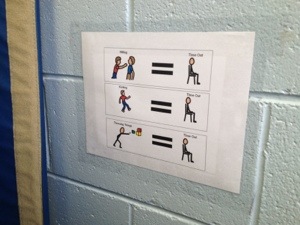
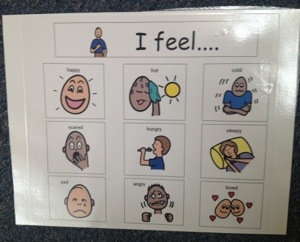
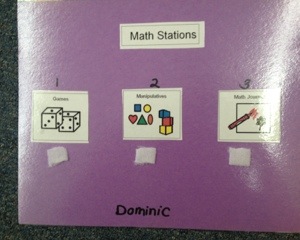
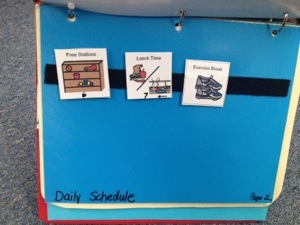
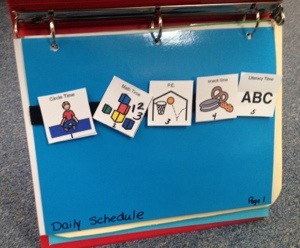
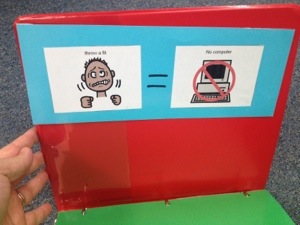
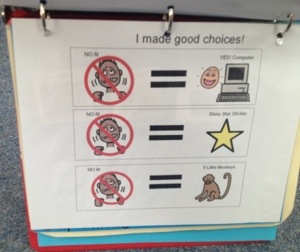
I am once again sharing these charts that I used with some students who benefitted greatly from the visuals. They needed visuals, to help them process the verbal directions that were being given in the school setting. The extra-abilities that they live with are: Autism, ADHD, Down’s Syndrome, PDD, Cerebal Palsy and other multiple cognitive disabilities. A few parents used these visuals at home and they reported that they enjoyed using them there.

When using a visual, the child learns not to “defy,” argue or throw a tantrum with a picture or visual. They learn to comply, because the picture said so.

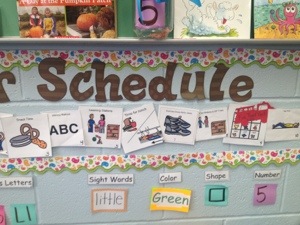
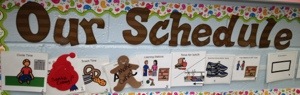
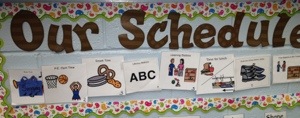
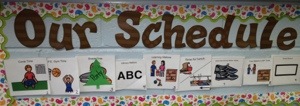
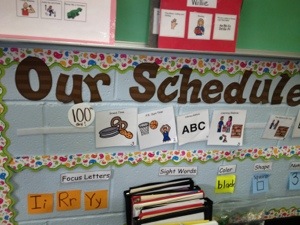
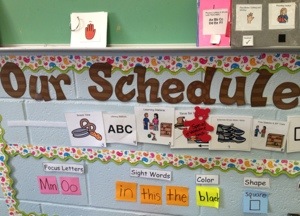
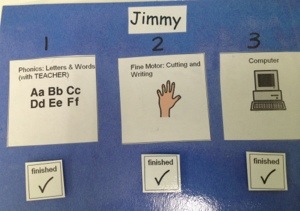
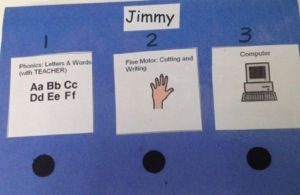
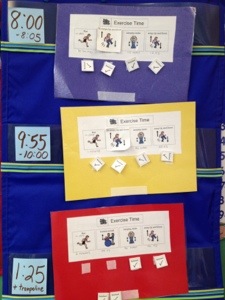
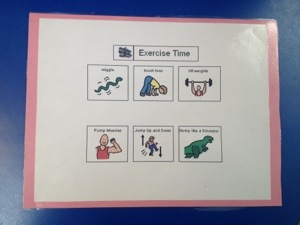
To assist my students, I have made a handful of visuals that have been successful. Here they are: If I have the link below the picture, then I have the printable available. If not…I’m so sorry, but it is floating around on a jump drive somewhere that I have to locate!
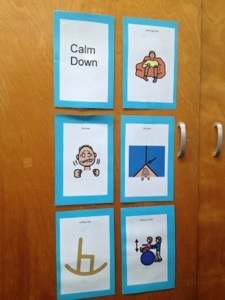
20131001-183438.jpg

Time Out Corner

20131001-183501.jpg

Time Out Chart

20131001-183533.jpg

Here is the link to my FREE time out chart: click here

20131001-183545.jpg

20131002-201918.jpg

20131002-201939.jpg

20131002-201954.jpg

20131002-202002.jpg

20131002-202015.jpg

20131002-202046.jpg

20131002-202054.jpg

20131002-202109.jpg

20131002-202135.jpg

20131002-202200.jpg

20131002-202207.jpg

20131002-202624.jpg

20131002-202641.jpg

20131203-035422.jpg

20131203-035501.jpg

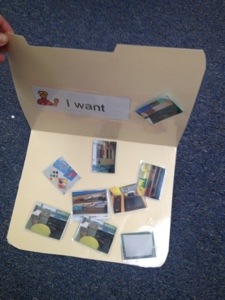
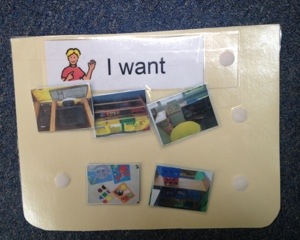
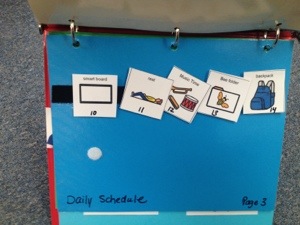
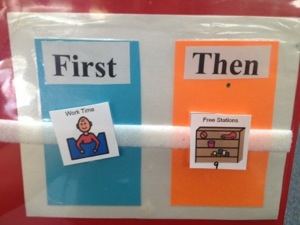
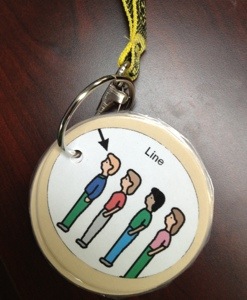
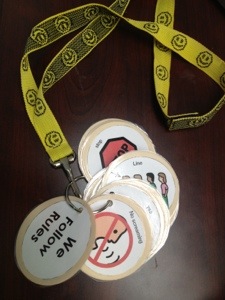
Visual Directions – Click here for the printable link

20131203-045102.jpg

20131203-045113.jpg

20131215-003930.jpg

20140525-225934.jpg

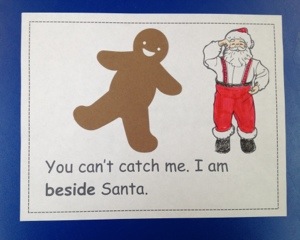
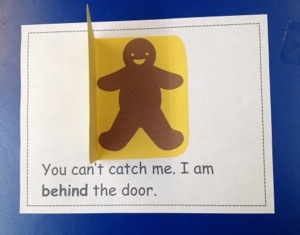
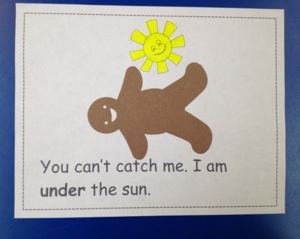
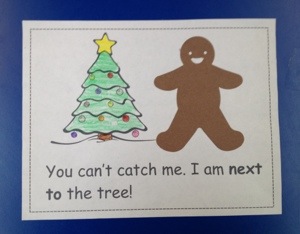
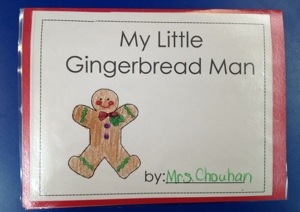
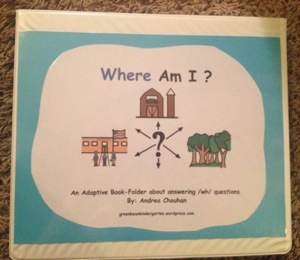
Adaptive Reading Book “Where Am I”– Click here for the link

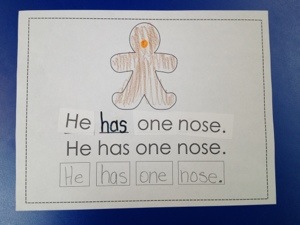
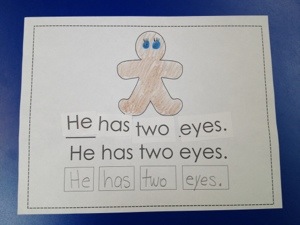
This is an interactive Adaptive Book answering /wh/ questions- “Where?” I created this book to teach and assess comprehension skills of stories. The question asked is: Where am I? Various answer choices are: bedroom, bathroom, Pizza Hut, shoe store, grocery store, etc…..

20140525-230003.jpg

20140525-230028.jpg

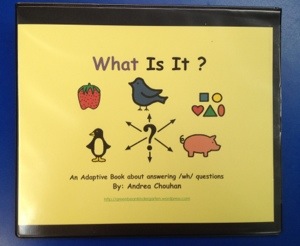
Adaptive Reading Book  “What Is It?”- Click here for the the link

I designed this book (as a special request from another super-star teacher). It is modeled after my other WH question adaptive books: “WHO am I?” and “WHERE am I?” already available for download on my TpT shop. I made these books for my students with autism (one non-verbal and one with limited comprehension skills). They are working wonders! My other students love them as well….there is just something about velcro!

This is also a great “cold read” book to use to have your student read and answer the questions on his own to see if he is comprehending what he reads.

20140525-230038.jpg

How to Make and Use this Book –

1. Print on Card Stock Paper.
2. Laminate.
3. Hole Punch each page, then place them in a 1-1 ½ inch binder.
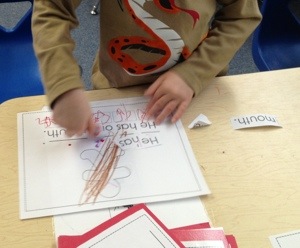
4. Place the question page and the answer page [top to bottom] so that when the child reads the page, he can see both pages at the same time.
5. The “adaptable” part of this book can be utilized by cutting out the 3 answer choice pictures for each question. (Laminate these also, then attach Velcro to the back).
6. Attach Velcro to the inside of the empty box on the “question” page. This is for placing the “answer” picture.


The Importance of Visual Schedules

A Pictorial or Visual Schedule allows young children (with special needs or typical) to know what is coming next in their day. It takes away anxiety because they can “read” pictures with ease. Just as we adults read the clock, or our Smartphones in anticipation, children feel the same anxiety. They just show their anxiety by rolling on the carpet, touching other children, talking and “not sitting still.”

Before I explain how to set up a visual schedule, I want to explain what can happen if you don’t have one. Children with Asperger’s, Autism or even gifted children can become upset when they do not know what will happen next or when the teacher changes the schedule. Or, if recess is cancelled due to the weather-this can truly rock some children’s world! However, when you ALREADY (the key word is already) have a visual schedule in place-then you can actually add new things to the schedule and it will NOT upset your students. They will actually already understand that they follow the schedule and “oh look, there is something new on the schedule that I will follow now.” I PROMISE-it works! This is why I capitalized it!

I actually met with a behavior specialist and asked him why it worked so well. He explained that it works because of its consistency. If you look through the pictures below, you will notice a tiny little die-cut of a fire truck, Santa Clause, Pumpkin and more. These were all special events at my school this year. I popped those pictures on the schedule and instead of anxiety from my special needs children, they said “what’s that?” I explained what it meant and what we were doing. The day before, I also explained, as well. As we went to that activity, I also gave them their very own die-cut to hold. So, when the fire truck visited, I gave them a fire truck die-cut as their “ticket” to see it. As we walked to the truck-they were excited!

Ok-moving on…..this is how I set up and use my visual schedule:

I placed a long velcro strip on the wall (yes-it will pull the paint off-eek! but it is worth it). Then, I made these pictures using Boardmaker Software. I laminated them and then added velcro to the back. Then, I place the pictures in my order of the day from left to right. There are 11 pictures total. As soon as we finish one activity, we sing the song and I take off the picture and place it in a little yellow pocket nearby the schedule. As I am doing this, I sing this transition song “Lunch time is finished, lunch time is finished, lunch time it finished, NOW it’s time for Exercise (of course whatever is finished, you change the word each time).” My students like to sing this little rhyme with me too! To keep order in the classroom, I teach them that it is the teacher’s job to take pictures off the schedule.

The Fire Truck visited on this day.

20131228-060323.jpg


I also put the fire truck die-cut on the calendar to show when it would be coming. Earlier that same week, we went to the farm for pumpkins. It could have been a stressful, crazy week-but it wasn’t. It was fun for all! Oh, the yellow star is our Library day visual reminder.

20131228-060339.jpg


Santa Clause visited our School on this day. We also made Gingerbread cookies on the same day. This was definitely on a Friday!

20131228-060413.jpg


This was our Polar Express movie day where everyone wore pajama’s, watched the movie and drank hot chocolate.


20131228-060443.jpg


The Little Blue Christmas present below is what I used for our “School Christmas Sing Along.” Finding a die-cut for that was impossible. The present worked just fine.

20131228-060454.jpg


Christmas Party Day – See the green Christmas tree?

20131228-060501.jpg


Santa Clause picture day!

20131228-060905.jpg


I hope this is helpful and please send me any questions. I’d be glad to answer them! Happy teaching! -Andrea

20140217-190530.jpg

20140217-190550.jpg

20140219-090404.jpg

Gingerbread Writing and Reading Kindergarten Activities

gingerbread-girl

Oh how we love the gingerbread man! We were busy reading, writing and demonstrating prepositions with a take home book. Then, we wrote and read about parts of a gingerbread man. Then, sequencing a cut up sight word sentence. Graphing the first part of the cookie that was eaten first was the next activity. You can download the printables from my TpT “store” here: http://www.teacherspayteachers.com/Product/My-Little-Gingerbread-Man-Mini-Unit-by-greenbeankindergarten-1005374 as a part of a mini-unit

gingerbread unit

PREPOSITION Book – This is printable and all you need is a gingerbread die-cut for the students to glue and add to the correct place as you are teaching “where” to place him.

20131215-005338.jpg

20131215-005154.jpg

20131215-005210.jpg

20131215-005227.jpg

20131215-005240.jpg

20131215-005253.jpg

20131215-005316.jpg

SIGHT WORD Sentence Cut Apart and Writing Book – This is great for reading, writing and fine motor work.

20131215-005606.jpg

20131215-005444.jpg

20131215-005506.jpg

20131215-005523.jpg

This is the famous “First Bite” Chart that is not my original idea. You simply pass out a gingerbread cookie (I like the Little Debbie brand). Have the children take a bite and ask them which body part they ate first. Then graph it either with their picture, a gingerbread die-cut, or by them writing their own name under the correct section.

20131215-034359.jpg

Fun Gingerbread Craft-ivity! My wonderful teacher Assistant created this with our students. She reviewed the body parts and discussed 2 legs, 2 arms, 2 eyes, 1 mouth, 1 stomach and then decided which body parts of the gingerbread man were real shapes (the stomach, the head and the eyes). Next, the children chose and named the color and amount of buttons they wanted. Oh, how we just love how they turned out!

20131215-034429.jpg

20131215-034443.jpg

RHYMING MAN – Here is our cute little dude that is helping us learn to rhyme words. This is quite possibly one of the hardest pre-reading skills in kindergarten! Rhyming can also be kind of boring, but our students had a lot of fun rhyming with the gingerbread man. First, I drew him on this chart paper. Then, I passed out only words that DID rhyme with -an and MAN. So, I set them up for success. Any word that they said or read to me WAS a word that rhymed with man. Then, I modeled how to write the word. After the 5-10 minute whole group lesson, this then became a small group lesson. I placed a double set of flashcards for the students to play “Memory,” and find 2 words that were the same and matched together. In another station, I placed the Rhyming man chart and placed a set of the flashcards for the children to match on top of the written word. For the next day, I drew a TREE and we did the exact same lesson, but with words that end in /-e/. On the third day, we sorted /-e/ and /-an/ words. Download the printable and 3-day lesson here: http://www.teacherspayteachers.com/Product/Rhyming-Word-Sort-Simple-Printable-1015046

Gingerbread rhyming image

20131215-034557.jpg

20131215-034617.jpg

20131215-034626.jpg

20131215-034645.jpg

Cute gingerbread clipart from: http://www.mycutegraphics.com

20131217-200633.jpg

20131217-205544.jpg

20131217-205553.jpg

20131219-051505.jpg

20140525-225559.jpg

20140525-225637.jpg

Ta-da! My Kindergarten Classroom

20130723-170319.jpg

Welcome to the happiest place on Earth….Kindergarten! This is just a simple virtual tour of my mostly, but not all the way, completed classroom. If it makes you feel all warm and cuddly inside-that’s great! My Kindergarten classroom is not the typical 18-24 student classroom. I have the privilege of having 8 wonderful students, who just happen to have special needs and other obstacles. But you know what? These children are little geniuses in the making. I am so looking forward to this school year! I will post more later….but here we go…on with the tour!

In these pictures, is my Word Wall for sight words, Possible Birthday Board, Home-ade un-stiched mini-curtains and more! The blue material is from Wal-Mart. The border is made out of brown paper towel rolls just all scrunched up and stapled on. My pennant banner was made from scrapbook paper from Wal-Mart and then stapled onto thin ribbon (also from Wal-Mart). The WELCOME sign above the bulletin board was hand-painted by me. I’m so proud of it because I am not exactly an artist. I just hand wrote out the letters on blue poster board and then used acrylic paint to decorate each one.

20130723-170335.jpg

I made my swirly tree by ripping up brown grocery bags and twisting them at the ends. I’m not sure what I am going to put on the tree yet. Hmmmm… I still haven’t decided what to do with the polka-dotted smaller bulletin board either. I may put my birthday wall there. We’ll see!

20130723-170418.jpgThese cute lime green curtains were so cheaply made. I bought those springy type curtain rods and material from Wal-Mart. Then, I stapled the material around the rod. To cover the staples, I used blue ribbon (from Hobby Lobby) and no-stich glue, because I don’t sew. In this picture you will also see the Block Center and to the left of it, a table for 1:1 work with students. The brown ABC Word Wall letters were made by Frog Street Press.

This is my Reading Center. It’s still in the making.20130723-170443.jpg

20130723-170455.jpg

Here is my fun desk! The funky flower material is from Hobby Lobby.

I actually hand-painted these capital letters above the Smart Board. The letters are from Lakeshore Learning. It was a fun project. That’s what I did this summer! The calendar, months of the year and shape signs are all from the Dollar Tree. Aren’t they cute?!

20130723-170504.jpg

20130723-170513.jpg

This cute fabric is from Hobby Lobby. I simply taped the material under by desk (you know, since I don’t sew).

20130723-170532.jpgThe “Our Schedule” section is at eye-level for the children and I will be putting Board Maker pictures of the schedule there -once I make them!

20130723-170552.jpg

20130723-170559.jpg

20130723-170608.jpg

Our School, Thompkins Early Childhood Center in Ozark, Alabama, is a “Bucket Filling School.” I will write more about bucket filling later. It’s great-but I will stay on topic for now.

This is the most precious little sign that I have outside of my classroom door. All of the classrooms have this sign. I think it’s a great reminder for everyone who enter! I hope you enjoyed this mini-tour!

20130723-170617.jpg