kindergarten

Kindergarten Assessment – Easy Breezy!

k assessment

This is a 2 page comprehensive Kindergarten Assessment that will give you a general starting point of what your students DO and DO NOT know. It can also be used to show what your students have or have not learned. One other use is to utilize this as an ongoing assessment, to monitor growth at the end of each grading period!

The “Kindergarten Assessment 1” tool is a great beginning of the year screener to reveal which students are entering K with pre-reading and school readiness skills or not.

The following skills are assessed on these “easy-to-read” and “easy-to-assess” pages:
1. All 26 capital letters
2. All 26 lowercase letters
3. Common letter sounds
4. Simple CVC Word Reading
5. Name Sample
6. Common Shapes
7. Number Identification
8. Number Writing Sample
9. Counting Sets of Objects
10. Rote Counting
11. Simple Sight Word Reading

Directions for Use:
1. Beginning of the Year Assessment – The “Kindergarten Assessment 1” tool can be used as a beginning of the year and end of the year tool to show student growth. Simply print one form and use it for the beginning of the year and then use the second form for the end of the year. Compare and use each form to show student growth.

2. Ongoing Assessment – Growing strides will be evident, and the need for RTI or Special Education intervention, as well. *Suggestion: at the end of each grading period, re-assess and record using a different colored ink pen. Date your data and add a + or – sign. Add up the amount of + signs, then compare between each grading period. Your data will speak for itself!

Click here for the link!

The link above will take you to a sample of the actual Assessment! Enjoy! -Andrea

Gingerbread Writing and Reading Kindergarten Activities

gingerbread-girl

Oh how we love the gingerbread man! We were busy reading, writing and demonstrating prepositions with a take home book. Then, we wrote and read about parts of a gingerbread man. Then, sequencing a cut up sight word sentence. Graphing the first part of the cookie that was eaten first was the next activity. You can download the printables from my TpT “store” here: http://www.teacherspayteachers.com/Product/My-Little-Gingerbread-Man-Mini-Unit-by-greenbeankindergarten-1005374 as a part of a mini-unit

gingerbread unit

PREPOSITION Book – This is printable and all you need is a gingerbread die-cut for the students to glue and add to the correct place as you are teaching “where” to place him.

20131215-005338.jpg

20131215-005154.jpg

20131215-005210.jpg

20131215-005227.jpg

20131215-005240.jpg

20131215-005253.jpg

20131215-005316.jpg

SIGHT WORD Sentence Cut Apart and Writing Book – This is great for reading, writing and fine motor work.

20131215-005606.jpg

20131215-005444.jpg

20131215-005506.jpg

20131215-005523.jpg

This is the famous “First Bite” Chart that is not my original idea. You simply pass out a gingerbread cookie (I like the Little Debbie brand). Have the children take a bite and ask them which body part they ate first. Then graph it either with their picture, a gingerbread die-cut, or by them writing their own name under the correct section.

20131215-034359.jpg

Fun Gingerbread Craft-ivity! My wonderful teacher Assistant created this with our students. She reviewed the body parts and discussed 2 legs, 2 arms, 2 eyes, 1 mouth, 1 stomach and then decided which body parts of the gingerbread man were real shapes (the stomach, the head and the eyes). Next, the children chose and named the color and amount of buttons they wanted. Oh, how we just love how they turned out!

20131215-034429.jpg

20131215-034443.jpg

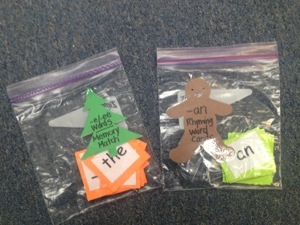
RHYMING MAN – Here is our cute little dude that is helping us learn to rhyme words. This is quite possibly one of the hardest pre-reading skills in kindergarten! Rhyming can also be kind of boring, but our students had a lot of fun rhyming with the gingerbread man. First, I drew him on this chart paper. Then, I passed out only words that DID rhyme with -an and MAN. So, I set them up for success. Any word that they said or read to me WAS a word that rhymed with man. Then, I modeled how to write the word. After the 5-10 minute whole group lesson, this then became a small group lesson. I placed a double set of flashcards for the students to play “Memory,” and find 2 words that were the same and matched together. In another station, I placed the Rhyming man chart and placed a set of the flashcards for the children to match on top of the written word. For the next day, I drew a TREE and we did the exact same lesson, but with words that end in /-e/. On the third day, we sorted /-e/ and /-an/ words. Download the printable and 3-day lesson here: http://www.teacherspayteachers.com/Product/Rhyming-Word-Sort-Simple-Printable-1015046

Gingerbread rhyming image

20131215-034557.jpg

20131215-034617.jpg

20131215-034626.jpg

20131215-034645.jpg

Cute gingerbread clipart from: http://www.mycutegraphics.com

20131217-200633.jpg

20131217-205544.jpg

20131217-205553.jpg

20131219-051505.jpg

20140525-225559.jpg

20140525-225637.jpg

Ta-da! My Kindergarten Classroom

20130723-170319.jpg

Welcome to the happiest place on Earth….Kindergarten! This is just a simple virtual tour of my mostly, but not all the way, completed classroom. If it makes you feel all warm and cuddly inside-that’s great! My Kindergarten classroom is not the typical 18-24 student classroom. I have the privilege of having 8 wonderful students, who just happen to have special needs and other obstacles. But you know what? These children are little geniuses in the making. I am so looking forward to this school year! I will post more later….but here we go…on with the tour!

In these pictures, is my Word Wall for sight words, Possible Birthday Board, Home-ade un-stiched mini-curtains and more! The blue material is from Wal-Mart. The border is made out of brown paper towel rolls just all scrunched up and stapled on. My pennant banner was made from scrapbook paper from Wal-Mart and then stapled onto thin ribbon (also from Wal-Mart). The WELCOME sign above the bulletin board was hand-painted by me. I’m so proud of it because I am not exactly an artist. I just hand wrote out the letters on blue poster board and then used acrylic paint to decorate each one.

20130723-170335.jpg

I made my swirly tree by ripping up brown grocery bags and twisting them at the ends. I’m not sure what I am going to put on the tree yet. Hmmmm… I still haven’t decided what to do with the polka-dotted smaller bulletin board either. I may put my birthday wall there. We’ll see!

20130723-170418.jpgThese cute lime green curtains were so cheaply made. I bought those springy type curtain rods and material from Wal-Mart. Then, I stapled the material around the rod. To cover the staples, I used blue ribbon (from Hobby Lobby) and no-stich glue, because I don’t sew. In this picture you will also see the Block Center and to the left of it, a table for 1:1 work with students. The brown ABC Word Wall letters were made by Frog Street Press.

This is my Reading Center. It’s still in the making.20130723-170443.jpg

20130723-170455.jpg

Here is my fun desk! The funky flower material is from Hobby Lobby.

I actually hand-painted these capital letters above the Smart Board. The letters are from Lakeshore Learning. It was a fun project. That’s what I did this summer! The calendar, months of the year and shape signs are all from the Dollar Tree. Aren’t they cute?!

20130723-170504.jpg

20130723-170513.jpg

This cute fabric is from Hobby Lobby. I simply taped the material under by desk (you know, since I don’t sew).

20130723-170532.jpgThe “Our Schedule” section is at eye-level for the children and I will be putting Board Maker pictures of the schedule there -once I make them!

20130723-170552.jpg

20130723-170559.jpg

20130723-170608.jpg

Our School, Thompkins Early Childhood Center in Ozark, Alabama, is a “Bucket Filling School.” I will write more about bucket filling later. It’s great-but I will stay on topic for now.

This is the most precious little sign that I have outside of my classroom door. All of the classrooms have this sign. I think it’s a great reminder for everyone who enter! I hope you enjoyed this mini-tour!

20130723-170617.jpg

No More Letter of the Week?

For more than five years, I taught a letter per week and sometimes every other week. That is just what we did at my former campus, and so did all the other Pre-K classrooms across that school district. I taught letter “Mm” and read stories about monsters, moose, mice and we made crafts based on the “Mm” words we were learning. The students tasted muffins and they decorated letter Mm. This is the letter of the week method. Well, it turns out that this is not the best way to teach children the letter names and sounds. Luckily, I was given the opportunity to use the book “No More Letter of the Week” in my Kindergarten classroom. After using this program for teaching letters, for only one school year, I am sold! I love this method so much and it is more fun for both me and my students. Recently, I began searching for the reasons and research behind the effectiveness of “No More Letter of the Week.”

Stock Image

I came across many articles found at a fellow teacher’s blog: http://www.pre-kpages.com/lotw/It turns out that she embarked on her own research as well. Here is the amazing research:

“Arguments for Moving Away From LOTW

  • Fluent letter recognition is one of the (if not THE) predictors of reading success (Adams, 1990).
  • Removing letters from their meaningful context removes the meaning and purpose from the letter.
  • Children who are taught letters in isolation have difficulty placing that information into literacy activities (Wood and McLeMore, 2001).
  • It is more meaningful to introduce letters as they become meaningful to the students.
  • Just because you and I were taught with the LOTW many years ago does not mean it is the BEST way to teach letters. Remember the Virginia Slims saying “We’ve come a long way baby”? Well, we have come a long way in education and current research supports teaching letters in context and not in isolation.
  • Teaching with LOTW slows readers down, yet it’s too fast for others, it doesn’t meet the needs of all learners and there is no room for differentiation.
  • The students who struggle the most with learning the letters are the ones who are least helped by teaching letters in isolation. They need something to help them make connections – isolating letters doesn’t do that.”

Teaching letters without focusing on a different letter each week

NMLOTW (No More Letter of the Week) teaches the sounds of letters within context of rhymes and motions. Children are selected to be a “Letter Expert” for each letter of the alphabet. The letter expert reads a book from her teacher, which is on her reading level, but contains words with the “special letter.” The letter expert practices the book at home and then reads it to the class. A sentence from the book is then written on pieces of sentence strips and the class works together to put the sentence back together again. The special letter is emphasized while the student teaches everyone about her expert letter. She brings in items beginning with her letter and she also brings in a large letter that is decorated with print and cut-outs from magazines that contain words beginning with the special letter. A special bulletin board or wall is set up by the teacher to display each letter. If the wall is at student level, it can be utilized by the children to reread the sentences using pointers. Their book can also be placed in the letter square. This is a great center, as the letter’s continue being added.

This is a very informative article, that is well worth reading: “N is for Nonsensical” by Dr. Susan B. Neuman http://www-personal.umich.edu/~sbneuman/pdf/nisfornonsense.pdf

20110815-113628.jpg This is the “Reading Wall.” This is the set-up part, before the student use it. I used painters tape on my second white board, to section off the 26 sections (plus 1). When each letter is introduced in the curriculum, one child will be the “Letter Expert,” and take home a large cut-out letter, an emergent reader book (I use little books from the Pearson Reading Street curriculum). Also, inside of the take home bag is a sentence from the book that contains a word beginning with the letter expert letter.

Here is the parent letter that I send home in the take-home bag: Letter expert parent letter

20110912-075116.jpg

20110919-062332.jpg

20110919-062353.jpg

Welcome to my brand new blog and thanks for coming!

I have created this blog to communicate more effectively with fellow teachers from around the globe, parents and my students. In our world today, so many of use use facebook, twitter, teacher websites and blogs as way to communicate with one another. E-mail and texting is now a substitute for phone calls (for me anyway)! This blog will be a way for me to tell everyone our most up to date happenings in our classroom. Blogs are simply a more effective way to share ideas because websites take a little more time to share postings.

So, why is this blog so important to me? I am a recent Master’s degree graduate of Walden University and our motto is to become a “scholar of change.” As I reflect upon my classroom last year, I realize that I have the power to bring positive social change to my classroom and home by using technology more and incorporating many more practices of conserving and re-using classroom things.

I would love for you to join me on this adventure as we commit to incorporating at least one “green” idea into our classroom and home this year. So, what will you do? I am excited to hear and I will be posting pictures soon!